
|
|
How to replace the fuel filter Disclaimer Please note that I am not a mechanic by trade and that I nor Turbocelica.nl can be held responsible for any damage, injuries or death caused by work you perform using this website as a guideline. Parts and tools needed Replacement fuel filter (Toyota part number 23300-79235) Basic socket set Spanners Do not smoke/make a camp fire or something when doing this job!  Location Before you start, locate the fuel filter and create some space to work in. Loosen the hose clamp of the airflow meter (AFM), disconnect the AFM connector and undo the four clips of the air box. Take out the AFM and air box lid, you should be able to reach the fuel filter easier now - it's mounted on the main chassis beam below the brake booster (left hand drive (LHD) car). If you've deleted the charcoal canister there's even more space available. 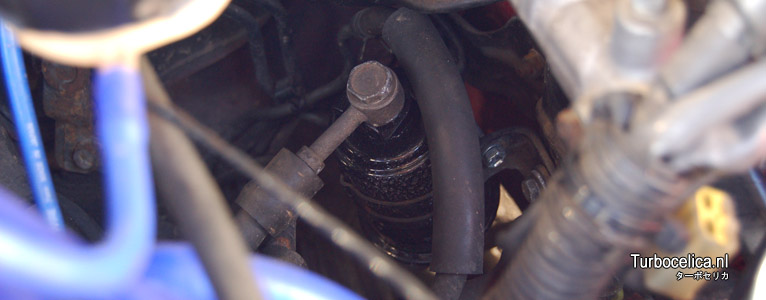 Replacing the fuel filter is very simple, IF you can get the top bolt out and fuel line off! The filter has a nut welded to the inlet as well as the outlet. Use a spanner to prevent the filter from twisting (and destroying the fuel line under the car) with these nuts, while using another spanner (or socket) to undo the banjo bolt on top and fuel hard line on the bottom of the filter. The filter itself is bolted to the chassis with 2 bolts, remove these to take the filter and its bracket out of the car. Be aware a bit of fuel can drip out. Install the new filter (use the new copper washers as supplied with the filter). Locate the Diagnosis terminal behind the strut tower: 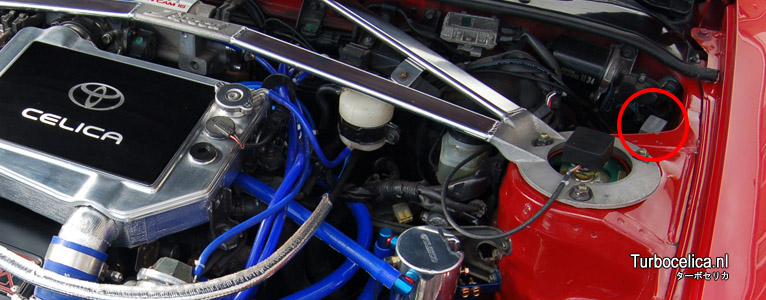 Open the cap. The diagram inside shows which connector is what. Connect FP and +B with the piece of wire, this will activate the fuel pump without starting the engine:  The photo shows E1 and TE1 bridged as an example Turn the ignition key to 'ON' but do not start the engine. You should hear the fuel pump running near the rear of the car. Let it run for a few seconds and start the car. If it runs fine, remove the wire from the diagnosis terminal and check the filter for leaks. Job done!  How to.. Top |
|
|